Tuesday, December 4, 2012

Editing Upcoming Events

Click on the video below to watch a tutorial on how to Edit Upcoming Events.

Flash

Tutorial Video (Flash Player)
If you would like to edit the Upcoming Events section in the left nav of your site you will need to log on to ts.wou.edu on the Remote Desktop. Within the X:drive/include_files/subsite_files folder you will find your site's folder there. Once inside the folder you will want to double click on the file called left_nav.php. It will open the file in Dreamweaver. Click the Code view button at the top


Depending on which month you want to show it will either be month01 for  January all the way to month12 for December. Change the month to the one you would like. Change the number date to what you would like it to be, if it is only a single digit put a 0 infront. (example January you would put 01) Then change the name of the event.

Then hit save. Refresh the browser and your changes should take effect.

Please let me know if you have further questions gauntzd@wou.edu or 503-838-8215

Thursday, November 29, 2012

Updating a PDF Link

Click on the video below to watch a tutorial on how to Update a PDF Link.

Flash

Tutorial Video (Flash Player)
To update a PDF link on your site you will need to log on to the Remote Desktop and locate the original file that you created the PDF from. For example a Word Document. Once your changes are made and you are ready to post it to the web do a "Save as a PDF"  Name it the exact name as the current PDF file on the web. Example if the path to the file is http://www.wou.edu/president/advancement/smith/documents/SeasonTicketsform2012-13.pdf you will need to save the PDF on the X:drive in the presidents/advancement/smith/documents folder with the name SeasonTicketsform2012-13.pdf A message box will pop up saying "The file SeasonTicketsform2012-13.pdf already exists. Do you want to replace the existing file?" Click "Yes" Then open your browser and refresh the page and the new PDF file should appear.

Please feel free to email me if you have any questions, gauntzd@wou.edu.

Wednesday, October 24, 2012

Edit a WOWSlider Slideshow

Click on the video below to watch a tutorial on how to Edit a WOWSlider Slideshow.

Flash

Tutorial Video (Flash Player)
Please feel free to email me if you have any questions, gauntzd@wou.edu.

Thursday, September 27, 2012

Refreshing the Digital Signage

Click on the video below to watch a tutorial on Refreshing the Digital Signage.

Flash

Tutorial Video (Flash Player)
Please feel free to email me if you have any questions, gauntzd@wou.edu.

Tuesday, August 28, 2012

Create an Image Slideshow

Click on one of the videos below to watch a tutorial on Creating an Image Slideshow
If you do not have Quicktime you can view the tutorial using a Flash player:
Flash

Tutorial Video (Flash Player)

Copy and paste this code


<script type="text/javascript">
$(document).ready(function(){
  $('#crossslide').crossSlide({
     sleep: 5,
     fade: 1,
shuffle: true
    }, [
     { src: 'http://www.wou.edu/student/admissions/californiagold/images/cal_1.jpg'},
{ src: 'http://www.wou.edu/student/admissions/californiagold/images/cal_2.jpg'},
{ src: 'http://www.wou.edu/student/admissions/californiagold/images/cal_3.jpg'}
    ]);
});
</script>


<div id="crossslide">&nbsp;</div>


Please feel free to email me if you have any questions, gauntzd@wou.edu.

Wednesday, August 1, 2012

Contribute CS4 Basic Features

Click on one of the videos below to watch a tutorial on Contribute CS4 basic features.
If you do not have Quicktime you can view the tutorial using a Flash player:
Flash

Tutorial Video (Flash Player)
Please feel free to email me if you have any questions, gauntzd@wou.edu.

Tuesday, July 31, 2012

Creating Lists in Contribute

Open the page you would like to edit in Contribute. Type your list.


Select the title of your list.


Go up to the top where the Style drop down is


Select the style you would like your header to be


Select all the items in your list


Click the Bulleted List button at the top, and your list should now be bulleted


If you would like your list to have red arrows instead of bullets select all the items in the bulleted list


Go up to the Styles drop down


Select arrow_list


Once you publish your page the arrow list should look similar to this below


If you would like a numbered list, select all the items in your list


Click the Numbered List button at the top


Once you are done with all your edits click Publish


Your lists should resemble these below


If you have any questions feel free to contact gauntzd@wou.edu

Thursday, June 28, 2012

Calendar Event Lists

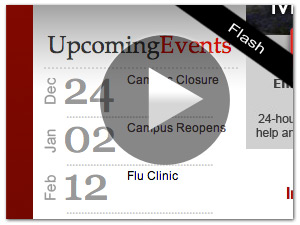
If you would like to list events on your website to have them look and feel like WOU's events, here is how you can do it.

You will need to login to ts.wou.edu through Remote Desktop.

Open the page that you would like to add these events too in Dreamweaver.

Select Code view.


I have given 2 separate examples, the first event listed is when the event lasts just one day while the second event goes for multiple dates.


You will notice in the code that there is a separate style being used for the date so that it will be a smaller size.


Copy and paste this code below where you would like the events to show up on the page and change out the blue fields with your event information. 

<span class="header_1">Upcoming Events in University Advancement</span>
  ..........................................................................................................

 <table style="width:700px" border="0" cellspacing="0" cellpadding="0">
  <tr>
    <td width="50" align="left" valign="top" class="dateNum">02
    </td>
    <td width="50" align="left" valign="top">
      <p class="sub_head_1">Jul</p>
      <p>2012</p>
    </td>
    <td align="left" valign="top">
      <p class="sub_head_1">Emeritus Society Meeting</p>
      <p><strong>12:30 p.m.</strong> | Year End Potluck at Gentle House</p>
    </td>
  </tr>
  <tr>
  <td colspan="3">
  ..........................................................................................................
  </td>
  </tr>
  <tr>
    <td width="50" align="left" valign="top" class="HPdateNum_small">12-13</td>
    <td width="50" align="left" valign="top">
      <p class="sub_head_1">Sep</p>
      <p>2012</p>
    </td>
    <td align="left" valign="top">
      <p class="sub_head_1">WOU Retirees Association Trip</p>
      <p>Ashland/Crater Lake</p>
    </td>
  </tr>
</table>


If you want to add more events then you will need to copy and paste the whole <tr> to the ending </tr> making sure you get both the <tr>s including the one with the dotted line. You will want to paste it before the ending </table>


Once you have entered in all your events, then hit save. Go to the page and hit refresh and all your events should be there with the WOU style.

Please let me know if you have further questions gauntzd@wou.edu or 503-838-8215

Thursday, May 31, 2012

Working with Images in Contribute

Open Contribute and navigate to the page where you would like to add an image. Put the cursor where you would like to insert the image, then click on the "Image" drop down at the top and select "From My Computer"


Navigate to where the image is located on your computer and then hit "Select"


In some cases your image will be too large for the web, so Contribute will automatically size it down for web optimization. Click "OK" if you get that message.


It will ask you to enter in a Description ALT text. This will show up if a person has their images turned off. Click "OK" once you have entered something.


Right click on the image and select "Image Properties"


You can change the size of the image, add extra padding around the image, and align the image. If you would like the text to wrap around the image you would want to align the image either to the Left or the Right. Once you have made the changes you would like click "OK".


You should then see your image take on all those new properties. The image below demonstrates the image aligning to the left so that the text now wraps around it.


If you have any questions feel free to contact gauntzd@wou.edu

Wednesday, April 4, 2012

Faculty Homepages

How to edit your faculty homepage

If you are a faculty member who did not automatically get a copy of a standard faculty page in your personal site follow these directions first.

Log-in to the Portal and select the Faculty tab.
Then under the My Programs channel select Faculty Information.


You can fill out your Office Hours, Biographical Information, you can check the box to add your Online Campus Directory photo


You can fill out any Additional Information and when finished hit the Update Information button at the bottom.


If you would like to do further editing you can remote desktop onto ts.wou.edu and open Adobe Contribute CS4.

In the Address bar type www.wou.edu/~your_username and hit enter.


Click the Create Connection button.


Click the Next button.


Click the Next button again.


Click the drop down arrow and select Local/Network and then click the Next button.


Click the My Computer.


Double click the public_html (P:) directory.


Click the Select button.


Click the Next button.


Put your full name and email address in the fields and hit the Next button.


Then click the Done button.


Then click the Edit Page button.


In the content box enter your content.


When you are done adding all your content hit Publish and your changes will be live!


If you have any questions feel free to contact gauntzd@wou.edu